La mise en place d'une ligne de production automatique de béton ne se fait pas du jour au lendemain. Elle prend généralement de 12 à 24 mois et comporte une série de phases structurées. Certaines étapes peuvent se dérouler rapidement, d'autres peuvent ne pas s'appliquer du tout à votre projet, mais chacune d'entre elles joue un rôle important pour garantir que votre opération se déroule sans heurts et en toute sécurité.
Ce guide vous explique comment mettre en place une chaîne de production de blocs de béton, du début à la fin. Vous verrez ce qu'il faut faire à chaque étape, quelles ressources et quels équipements sont nécessaires et comment garder le cap jusqu'à ce que votre première livraison de produits en béton soit prête à être lancée.
Principaux enseignements
- La construction d'une ligne de production de blocs entièrement automatisée prend généralement de 12 à 24 mois, répartis en neuf phases clés.
- L'automatisation améliore la productivité, réduit l'intervention humaine et garantit une qualité constante des produits.
- Une planification intelligente, un équipement adéquat et des mesures strictes de contrôle de la qualité constituent l'épine dorsale de la réussite.
- Chaque site de production présente des défis uniques, et le fait de sauter des étapes entraîne souvent une perte de temps et des problèmes de conformité par la suite.
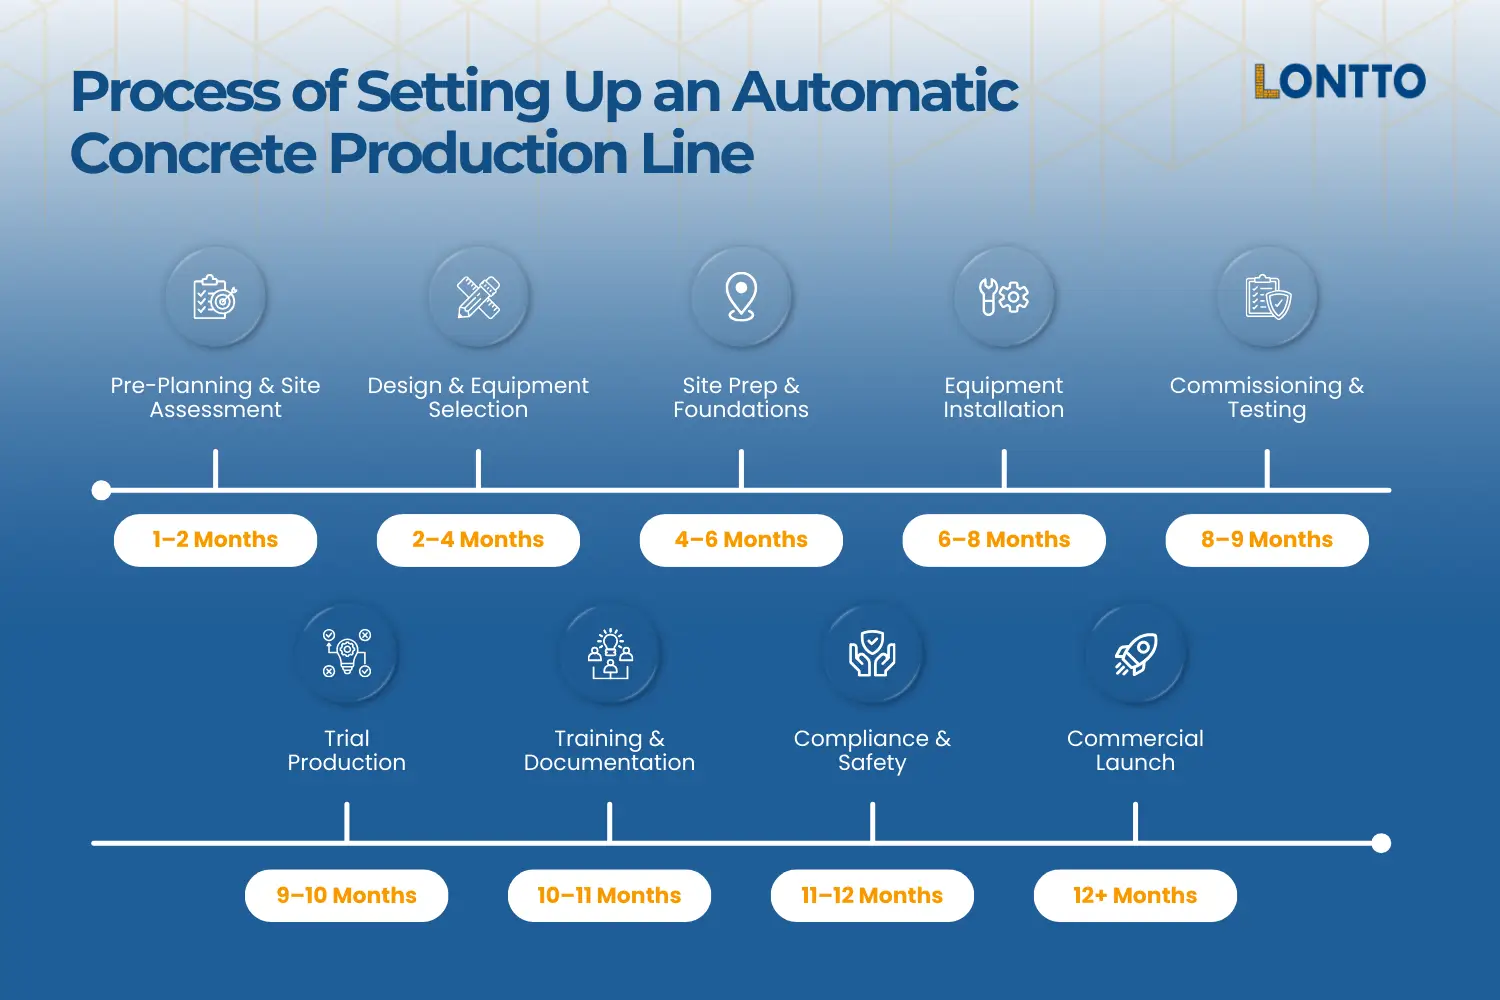
| Phase | Mois | Focus | Principales étapes |
|---|---|---|---|
| 1. Pré-planification et évaluation du site | 1-2 | Marché, site, permis | (1) Analyse du marché et de la demande, (2) Sélection du site (2 à 3 hectares, services publics, accès), (3) Plan d'affaires et autorisations |
| 2. Conception et sélection des équipements | 2-4 | Disposition et machines | (4) Conception de l'usine, (5) Acquisition d'équipements (mélangeurs, trémies, silos, PLC), (6) Conception du système d'automatisation |
| 3. Préparation du site et fondations | 4-6 | Travail de fond | (7) Défrichement du site et installation des services publics, (8) Coulage et durcissement des fondations, (9) Installation des services publics (électricité, eau, air, télécommunications) |
| 4. Installation de l'équipement | 6-8 | Assemblée | (10) Composants structurels (trémies, silos, ancrages), (11) Systèmes mécaniques (convoyeurs, mélangeurs, unités de dépoussiérage), (12) Intégration du système de contrôle |
| 5. Mise en service et essais | 8-9 | Inspection et étalonnage | (13) Inspections préalables à la mise en service, (14) Essais à vide, (15) Étalonnage et configuration du PLC |
| 6. Production d'essais | 9-10 | Essais et optimisation | (16) Premiers lots d'essai, (17) Optimisation du processus, (18) Validation des performances |
| 7. Formation et documentation | 10-11 | Préparation de la main-d'œuvre | (19) Formation des opérateurs (automatisation, sécurité, maintenance), (20) SOP et plans de maintenance préventive |
| 8. Conformité et sécurité | 11-12 | Systèmes de sécurité et d'environnement | (21) Mise en œuvre de la sécurité (EPI, LOTO, surveillance), (22) Contrôles environnementaux (poussière, eau, bruit, déchets) |
| 9. Lancement commercial | 12+ | Production à grande échelle | (23) Inspections et certifications finales, (24) Lancement de la production commerciale et suivi des indicateurs clés de performance. |
Phase 1 : Pré-planification et évaluation du site (mois 1 à 2)
La première étape de la mise en place d'une ligne de production automatique de béton est la planification. Avant d'investir dans des machines ou des travaux de construction, vous devez avoir une idée claire de la demande du marché, de l'adéquation du site et des exigences en matière d'autorisation.
Étape 1 : Analyse du marché et des besoins de production
Commencez par examiner la demande de béton dans votre région. Une centrale est généralement viable si elle peut vendre au moins 20 à 30 m³ par jour. Les projets plus importants peuvent nécessiter une capacité de production de 25 à 180 m³ par heure.
Vérifiez également les tarifs pratiqués par vos concurrents. Les tarifs habituels se situent entre $70 et $160 par m³. Identifiez les types de béton les plus demandés, qu'il s'agisse de béton prêt à l'emploi, de béton pompé ou de produits préfabriqués.
Étape 2 : Sélection et évaluation du site
Pour une centrale à béton stationnaire, vous aurez besoin d'un terrain industriel d'au moins 2 à 3 acres, avec la possibilité de l'agrandir ultérieurement. Assurez-vous que le sol peut supporter une capacité de charge d'au moins 150 kN/m² et confirmez l'accès facile aux routes et aux fournisseurs de matières premières telles que le ciment et les agrégats. Les services publics sont tout aussi importants : vous aurez besoin d'une alimentation électrique fiable de 380 à 480 V et d'une source d'eau propre.
Étape 3 : Plan d'entreprise et permis
Décrivez votre investissement en capital, la capacité de production en bloc prévue, les besoins en main-d'œuvre et l'approche commerciale. Incluez des projections financières pour convaincre les investisseurs et les prêteurs. En ce qui concerne la conformité, demandez les autorisations de zonage, les permis environnementaux et les licences d'exploitation pour la production automatique. N'oubliez pas de prévoir une évaluation de l'impact sur l'environnement à l'avance, car la procédure peut prendre du temps.
Phase 2 : Conception et sélection des équipements (mois 2 à 4)
Une fois le site sécurisé, l'étape suivante de la mise en place d'une ligne de production automatique de béton consiste à concevoir l'agencement et à choisir l'équipement adéquat. Une bonne conception permet de réduire le temps de manutention des matériaux, d'économiser de l'énergie et de jeter les bases d'un fonctionnement sans heurts.
Étape 4 : Conception de l'implantation de l'usine
Votre ligne de production de blocs commence par une disposition claire. Les fondations doivent comporter des points d'ancrage suffisamment solides pour supporter des machines de production lourdes. Placez les bacs à agrégats de manière à ce que les chargeurs puissent y accéder facilement.
Acheminez les convoyeurs de manière à réduire les distances de déplacement des matériaux. Placez les silos à ciment à proximité des systèmes de pesage et réservez de l'espace pour une zone de chargement des camions avec une gestion adéquate des files d'attente.
Étape 5 : Spécification et acquisition du matériel
Choisissez des malaxeurs adaptés à vos objectifs de production. Les malaxeurs à double arbre fonctionnent bien pour les lots de 1 à 4 m³, tandis que les malaxeurs planétaires sont souvent utilisés pour les éléments préfabriqués en béton spécialisés. Les bacs à granulats doivent comprendre 2 à 6 compartiments avec des capteurs d'humidité pour plus de précision.
Les silos à ciment ont généralement une capacité de 50 à 500 tonnes et sont équipés de systèmes pneumatiques pour une alimentation fiable. Les systèmes de pesage doivent avoir une précision de ±1 kg, et un système de contrôle basé sur un automate programmable permet une automatisation complète et la gestion des recettes.
Étape 6 : Conception du système d'automatisation
L'automatisation est la clé d'une ligne de production de blocs entièrement automatique. L'automate programmable doit être programmé pour des séquences de dosage automatiques, le stockage des recettes et la surveillance en temps réel. Les panneaux à écran tactile de l'IHM facilitent le travail du personnel, tandis que l'accès à distance permet aux responsables de suivre les données de production et d'ajuster les paramètres en cas de besoin. L'automatisation de la production réduit l'intervention humaine, améliore la productivité et garantit une qualité constante des produits.
Phase 3 : Préparation du site et construction des fondations (mois 4 à 6)
Si vous construisez une nouvelle installation, cette phase se concentre sur la préparation du terrain et la mise en place de fondations solides. L'achat d'un bâtiment existant peut vous permettre de sauter certaines de ces étapes, mais pour les nouveaux sites, il est important de suivre de près les plans d'ingénierie.
Étape 7 : Déblaiement et préparation du site
La première tâche consiste à déblayer et à niveler le terrain à ±25 mm près. La végétation, les débris et les obstacles doivent être enlevés. Les services publics temporaires, les routes d'accès au site et les zones de transit doivent être mis en place pour que les équipes puissent travailler efficacement. C'est également le moment de mettre en place des mesures de contrôle de l'érosion pour protéger l'environnement.
Étape 8 : Construction des fondations
Une fois le site prêt, l'excavation commence. L'acier d'armature (généralement de qualité 500 MPa avec un espacement de 150 mm) est mis en place et des boulons d'ancrage sont enfoncés pour fixer les lourdes machines de production. La fondation en béton est ensuite coulée à une profondeur de 300 à 400 mm en utilisant un grade minimum C25. Une période de durcissement d'au moins sept jours est nécessaire avant toute installation d'équipement.
Étape 9 : Installation des services publics
Une fois les fondations en place, l'attention se porte sur les services publics. Une alimentation électrique triphasée de 380 à 480 V avec une alimentation de secours doit être installée. Les conduites d'eau doivent être raccordées à des systèmes de filtration et de stockage. De l'air comprimé à une pression de 6 à 8 bars est ajouté pour soutenir les machines, et les télécommunications sont mises en place pour que le système de contrôle puisse fonctionner sans problème une fois la production lancée.
Phase 4 : Installation et assemblage de l'équipement (mois 6 à 8)

Une fois les fondations durcies et les équipements en place, l'accent est mis sur l'installation de l'équipement principal. Cette étape rassemble les systèmes structurels, mécaniques et de contrôle qui formeront le cœur de la chaîne de production.
Étape 10 : Installation des éléments structurels
Commencez par ériger la structure de l'usine et les plates-formes d'accès à l'aide de grues. Positionnez correctement les silos à agrégats et équipez-les de capteurs et de vibrateurs pour assurer la cohérence du dosage. Utilisez des systèmes de transport pneumatique pour monter vos silos à ciment, et installez et étalonnez tous les équipements de pesage sur une base zéro.
Étape 11 : Installation des systèmes mécaniques
Des systèmes mécaniques sont ensuite ajoutés, notamment l'installation de convoyeurs à bande et d'alimentateurs à vis, afin d'assurer l'alignement du flux de matériaux. Les bétonnière est monté avec ses systèmes hydrauliques, et des unités de dépoussiérage avec filtration de l'air sont connectées pour maintenir la qualité de l'air et soutenir la qualité du produit pendant la production.
Étape 12 : Intégration du système de contrôle
La dernière étape consiste à intégrer le système de contrôle. Les armoires PLC sont placées dans des salles climatisées pour plus de fiabilité, et tous les capteurs et actionneurs sont connectés. Les postes de travail des opérateurs sont équipés de panneaux IHM et les réseaux de communication sont configurés pour permettre une surveillance et des ajustements en temps réel pendant la production automatisée.
Phase 5 : Mise en service et essais du système (mois 8 et 9)
Avant de passer à la production de masse, l'usine doit subir une série complète d'inspections et d'essais. Cette étape permet de s'assurer que les machines, les systèmes d'automatisation et de sécurité fonctionnent comme prévu.
Étape 13 : Inspections préalables à la mise en service
Commencez par une inspection minutieuse de tous les composants. Les connexions électriques et la mise à la terre doivent être vérifiées, de même que les pressions hydrauliques et pneumatiques. Les verrouillages de sécurité et les arrêts d'urgence doivent être testés pour confirmer qu'ils fonctionnent correctement avant que la machine à blocs ne soit mise en service.
Étape 14 : Essais à blanc
Une fois les inspections terminées, faites fonctionner l'équipement sans matières premières. Les bandes transporteuses doivent être alignées correctement et se déplacer à la bonne vitesse. Les systèmes de pesage doivent être vérifiés à l'aide de poids de contrôle certifiés, et le malaxeur à béton et son système de décharge sont mis en marche pour confirmer que les cycles fonctionnent sans heurts.
Étape 15 : Étalonnage et configuration du système
La précision du dosage et du mélange est la base de la qualité du produit. Toutes les balances doivent être étalonnées avec des poids certifiés et les recettes de mélange programmées dans le système de contrôle PLC. Les paramètres de production, les réglages d'alarme et le séquençage automatique sont configurés de manière à ce que le processus soit cohérent, efficace et ne nécessite qu'une intervention humaine minimale.
Phase 6 : Production d'essais et tests de qualité (mois 9 et 10)
La production d'essai permet à l'usine de prouver qu'elle peut fournir de manière constante la qualité requise avant de passer à l'exploitation à grande échelle. Cette étape permet de confirmer que le processus de production, le contrôle de la qualité et les performances du système sont conformes aux objectifs de conception.
Étape 16 : Premiers lots de béton
Commencez par produire de petits lots d'essai en utilisant des recettes de mélange de béton standard. Veillez à ce que le mélange soit uniforme et l'écoulement régulier, et effectuez des essais d'affaissement pour vérifier la consistance. Les essais de résistance à la compression confirment que le béton durci répond aux exigences structurelles. Ajustez les niveaux d'eau et les durées de mélange si nécessaire pour améliorer la qualité du produit et stabiliser les produits finis.
Étape 17 : Optimisation de la production
Une fois les lots d'essai terminés, affiner le processus. Ajuster les séquences de dosage et de mélange pour raccourcir les temps de cycle et maintenir un flux de matières régulier. Calibrer les systèmes de compensation de l'humidité pour tenir compte des variations des matières premières. Parallèlement, passez en revue les procédures de contrôle de la qualité et la documentation pour vous assurer qu'elles sont efficaces et prêtes pour une utilisation de routine.
Étape 18 : Validation des performances
La ligne de production de blocs entièrement automatique devrait maintenant atteindre des taux de production de 5% de la capacité nominale. La qualité du béton doit correspondre aux spécifications et la précision du dosage doit être maintenue à ± 1 %. Les dispositifs de sécurité, les alarmes et les arrêts d'urgence doivent être testés une dernière fois pour confirmer que l'environnement de production automatisé est sûr et prêt pour une utilisation continue.
Phase 7 : Formation des opérateurs et documentation (mois 10 et 11)
Une ligne de production de blocs entièrement automatique fonctionne mieux lorsque les opérateurs sont formés pour manipuler l'automatisation en toute confiance et suivre des procédures claires. Cette phase permet d'acquérir les compétences et la documentation nécessaires à une stabilité à long terme.
Étape 19 : Formation complète de l'opérateur
Les opérateurs doivent apprendre les procédures de démarrage et d'arrêt de l'usine, comment passer du mode manuel au mode automatique pour le béton et les protocoles de sécurité qui garantissent la sécurité de la production. La formation couvre également les tâches d'entretien et de dépannage afin de réduire au minimum les temps d'arrêt et de maintenir les machines en bon état. Grâce à une préparation adéquate, la main-d'œuvre peut assurer une production de produits en béton préfabriqué d'une qualité constante.
Étape 20 : Documentation et procédures
Chaque étape du processus de production doit être documentée. Les procédures opérationnelles normalisées doivent couvrir le mélange, le dosage, la maintenance et les tests de qualité. Des programmes de maintenance préventive doivent être établis pour les mélangeurs, les convoyeurs et l'installation de dosage.
Les mesures de contrôle de la qualité doivent être clairement consignées par écrit afin de protéger la qualité des produits. Il est également important d'enregistrer les coordonnées des fournisseurs et de tenir à jour un inventaire des pièces détachées afin que l'usine de blocs puisse continuer à fonctionner sans interruption.
Phase 8 : Mise en œuvre de la conformité environnementale et de la sécurité (mois 11 et 12)
Une ligne de production n'est complète que lorsque des mesures de sécurité et de protection de l'environnement sont en place. Ces mesures protègent les travailleurs, limitent l'impact sur l'environnement et permettent à la ligne de production de blocs d'être conforme à la réglementation.
Étape 21 : Mise en œuvre du système de sécurité
Prévoyez des postes d'EPI avec des respirateurs et des gants résistants aux alcalis, et formez le personnel aux procédures de verrouillage et d'étiquetage pour toutes les machines de production. Les règles d'entrée dans les espaces confinés et les programmes de surveillance des produits chimiques contribuent à réduire les risques et permettent aux opérateurs de travailler en toute sécurité tout en gérant le béton de manière automatisée.
Étape 22 : Contrôles environnementaux
L'air, l'eau et le bruit doivent être gérés avec soin. Les systèmes de dépoussiérage doivent être mis en service pour répondre aux normes de qualité de l'air, tandis que les unités de traitement de l'eau doivent être en place pour les lavages et les écoulements provenant des opérations de dosage et de mélange.
La surveillance du bruit contribue à protéger la santé des travailleurs, et les systèmes de gestion des déchets doivent recycler les sous-produits des matières premières dans la mesure du possible. Ces mesures limitent l'impact environnemental de la production de masse et permettent à votre usine de blocs de rester conforme.
Phase 9 : Lancement et exploitation commerciale (mois 12+)
La dernière étape de la mise en place d'une chaîne de production automatique de béton consiste à passer des essais à l'exploitation à grande échelle. À ce stade, l'usine doit être certifiée, dotée d'un personnel complet et prête à fournir des produits en béton à ses clients.
Étape 23 : Inspections et approbations finales
Effectuer toutes les inspections réglementaires restantes et obtenir les permis, assurances et certifications nécessaires. Les contrôles finaux confirment que les systèmes de sécurité, les mesures environnementales et le contrôle de la qualité sont en place pour soutenir la production automatisée en cours.
Étape 24 : Lancement de la production commerciale
Une fois les autorisations obtenues, l'usine peut commencer les livraisons commerciales de blocs de béton et de produits préfabriqués en béton. Utilisez les systèmes de planification et de répartition de la production pour organiser les livraisons et gérer efficacement la distribution du béton.
Suivre les volumes de production et les indicateurs clés de performance avec pour objectif de maintenir l'efficacité au-dessus de 85%. Un solide programme d'assurance qualité et un système de service à la clientèle permettront de s'assurer que les produits finis répondent aux spécifications et que les projets de construction respectent le calendrier.
Comment mettre en place une ligne de production automatique de béton FAQs
Quelles sont les vérifications à effectuer avant l'ouverture d'une ligne de production automatique de béton ?
Avant toute exploitation commerciale, l'usine doit confirmer l'intégrité de sa structure, la certification de ses systèmes électriques et de pesage, ainsi que le fonctionnement de ses mécanismes de sécurité. Les services publics tels que le dépoussiérage, l'eau et les systèmes d'air comprimé doivent également faire l'objet d'essais et de vérifications complets afin de garantir la conformité et la fiabilité des performances.
Comment procéder à des essais à sec et à des essais en milieu humide ?
L'essai à vide commence par la mise sous tension des systèmes électriques, la confirmation de l'état des indicateurs et le démarrage du compresseur d'air pour atteindre 6 à 8 bars. Les bandes transporteuses sont mises en marche pour vérifier la direction et l'alignement, et le mélangeur fonctionne à vide pendant 5 minutes pour vérifier les vibrations et le bruit. Les balances sont étalonnées avec des poids de contrôle certifiés avec une précision de ±1 kg, et tous les verrouillages de sécurité et les arrêts d'urgence sont testés.
L'essai par voie humide consiste à charger les bennes de granulats avec des matériaux propres, à remplir les silos avec au moins 10 tonnes de ciment et à confirmer les systèmes d'eau et de mélange. Une recette d'essai composée de 350 kg de ciment, 800 kg de sable, 1 000 kg de pierre et 175 litres d'eau est mise en lot automatiquement, mélangée pendant 90 secondes, vérifiée pour l'affaissement (75-100 mm) et échantillonnée pour les essais de résistance à 7 et 28 jours.
Retour en haut de la page : Comment mettre en place une ligne de production automatique de béton

Je m'appelle Chao Zhang et je travaille dans l'industrie de la fabrication de briques depuis plus de 10 ans. J'ai une connaissance approfondie et des recherches sur différents modèles de machines de fabrication de blocs, en particulier les machines automatiques à fabriquer des briques, les machines à fabriquer des blocs de béton, les machines à fabriquer des blocs de terre comprimée, les machines à fabriquer des briques d'argile, les machines à fabriquer des briques de ciment. J'ai une connaissance particulière de ce secteur. Je peux aider mes clients à choisir la machine à briques appropriée et les assister dans la conception et la construction d'une usine de production de briques. Si vous voulez tout savoir sur les machines à fabriquer des briques, n'hésitez pas à me contacter. Je me ferai un plaisir de vous aider.
